Wednesday, 1 June 2016

Current Favourites!


Hello Everybody!

Welcome to June! May has gone by so quickly its unbelievable. I feel like it was Christmas only last week. I've got a very different blog post for you today which is something entirely different from what I usually post. Today I bring to you my Current Favourites!


To begin, my first favourite has to be the NYX Soft Matte Lip Cream in Cannes. A NYX counter recently opened up in a Boots close to me and I was so excited! I picked up two Soft Matte Lip Creames; one in Milan and the other in Cannes. Milan is an extremely bright pink, and Cannes is a brown toned red colour. I really like these as I don't think they are as heavy as a normal liquid lipstick, yet they are opaque and long lasting once they have dried. The formulation is creamy but dries a solid matte, I also do not find them drying on my lips which I was very happy about. Overall, I really do love them. Cannes is my personal favourite of the two as I feel it is more wearable for every day. 

(£5.50)


My second favourite has to be my pair of black linen dungarees. I absolutely love these, I first bought them to wear on a meal out and also for a summer trip to Poland I am going on with school which is something I really do love about these- you are able to dress them up or down! Not only do they look really lovely in my opinion, they are very comfortable to wear. They are from New Look. 


Another recent favourite of mine has been the Molton Brown Pink Peppercorn Body Scrub. I received this as a Christmas present from my aunt and uncle but have not been wanting to use it for fear of running out! This polish is not too abrasive and leaves you smelling wonderful. I would highly recommend this scrub.


I have been absolutely loving High Beam by Benefit too! I also got this for Christmas and have loved it ever since I first tried it, especially these past few months. It is simply wonderful. The cream highlighter can be blended under or over foundation, leaving you with a subtle healthy glow which I have received compliments for. 


Above is an unblended thick swatch of High Beam. Below is a similar sized swatch blended with my finger tips. 

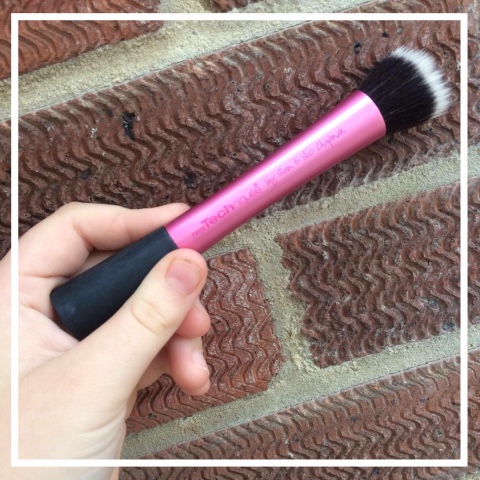
To blend High Beam, I have recently been love, love, loving the Stippling Brush by Real Techniques. This is such a versatile brush which I have previously used for foundation and concealer too, It really buffs in cream products and leaves you with an almost photo-shopped finish. I also find that this brush does not get clogged with product and need washing once you have used it a couple of times! (Although I do recommend washing your make-up brushes weekly if you use them regularly.)


Another recent favourite has to be the TV show "Summer Heights High." This BBC3 series first aired in 2008 but was put on BBC iPlayer in the past two weeks. It is a parody of secondary school life in Australia, following three people at the school for one term. Firstly, Jonah Takalua who is a Year 8 pupil who cannot read and is rebellious. Secondly, Ja'mie King. She is an exchange pupil from her private school Hillford Girls Grammar who is experiencing public school life for the first time. And finally, Mr. G who is a drama teacher appointed the head of drama. This series is hilarious and has two sequels which aired in the past two years:  "Ja'mie: Private School Girl." and "Jonah from Tonga." 


Finally, I have been really loving "fun."'s music. Some personal favourites from the album "Some Nights" include the song, "Some Nights" , "All Alone" and "Carry On."


Thank you for reading, I hope to see you soon with a new blog post!
See you soon, 


Georgia xo

Sunday, 1 May 2016

Traditional Gravy With Meat Juices


Hello Everybody!
Today I am going to be sharing my recipe of Traditional Gravy made with meat juices. This recipe uses lots from a home made roast dinner be it from the vegetable water to the sweat of the onions. There aren't exact measurements for this recipe, you just go by eye. Enjoy!


As I said before, you can use so many different juices and waters from making your roast dinner. Here, I used the water left from boiling swede. 


I used a beef stock pot (alternatively, you could also use a stock cube or any other kind of stock pot) and placed it in a Pyrex jug. 


Once the swede was boiled, I poured about half of the swede juice onto the stock pot and put the jug to one side.


Under the lamb, I put some cut up carrot, onion and celery to add flavour to the meat and create a more flavoursome juice to use in the gravy.


To put into the lamb, I cut some Rosemary from the herb garden in the front of our house. 


I made small incisions into the top of the lamb and stuffed a small piece of garlic into the hole, along with a stem of Rosemary and seasoned. 


This is what the lamb looked like after an hour and a half in the oven and placed that to one side to rest. This left the meat juices and caramelised vegetables in the bottom. 


I removed the vegetables to leave the juices from roasting the meat. 


On a medium heat, I added a heaped tablespoon of plain flour to the juices to thicken.


Once thickened, I added the stock from earlier to the mixture. 


Finally, I poured the finished gravy into a jug, ready to heat up later. 
If your gravy has gone cold, heat it in the microwave for one minute. 


I poured a generous amount of gravy onto the roast lamb dinner and it tasted great!

I hope you enjoyed this blog post, please read my other recipes down below!

Thank you for reading, see you soon!

Georgia xo


Sunday, 10 April 2016

Chocolate Brownies

Hello Everybody!

It's been months since I've written a post, which I'm sorry for. I haven't been baking or had the time to bake since my last post but today I did! I made Chocolate Brownies. These are so lovely and they always go in just a few days in my household. This recipe is super easy to follow and it will be below, as always. Enjoy! 


I didn't quite manage to take a picture of all the ingredients before combining them, but I let the butter melt to and soften in the sun on a window sill. 


This recipe is quite simple, as you just add all ingredients into a bowl and mix!


As you can see, my butter was extremely softened. 


After the flour, butter, cocoa powder and sugar had been combined, I added all the chocolate chips! 


Once ready, I spooned the mixture into a greased and lined tin. 


Like this!


With a spatula, I smoothed out the brownie mixture evenly in the tin. 


I then popped them in the oven for 30 minutes, (the recipe says 40-45 but in my one, this would've burned them!) 


This is how they came out in the pan after half an hour at 160°C in a fan oven. 


You should always let your brownies fully cool, to avoid them crumbling and losing their gooey texture.


I finished the display by piling them up and with a sprinkling of icing sugar.


We decided to have our brownies after a roast dinner. 
To serve, a scoop of vanilla Cornish ice cream and a tumble or raspberries! 

I absolutely loved creating these brownies, and they are always a massive hit with friends and family! 


Thankyou for Reading, 
See you soon! 

Georgia! xo
____________________________________________________

CHOCOLATE BROWNIES 

Ingredients
275g Butter, Softened 
375g Caster Sugar (I only used 300g and they turned out lovely!) 
4 large Free Range eggs 
75g Cocoa Powder 
100g Self-Raising Flour 
100g Plain Chocolate Chips 

Method
1) Pre-heat your oven to 180°C // 160°C FAN // Gas Mark 4 

2) Grease and line your brownie tin in butter and grease proof paper. 

3) Mix all of your ingredients together in a bowl.

4) Once combined, pour your mixture into your lined brownie tin and even out with a spatula. 

5) Put your brownies into the oven for 40-45 minutes. (30 minutes baked mine perfectly.)

6) Once fully cooked, take your brownies out the oven and leave on the side to cool.

7) Once cooled, turn your brownies out onto a flat, clean surface and cut into as many pieces as you like. 

8) Serve with a scoop of vanilla ice cream and raspberries. (Optional!) 

9) ENJOY YOUR BROWNIES! 


Sunday, 10 January 2016

Healthy Banana and Oat Breakfast Muffins

Hello Everybody!

I hope you've all had a great Christmas and new year. As you may have seen, I haven't posted since December last year as I took a break to spend time with family and friends. 
But, I'm back to kickstart 2016, the healthy way! I bring to you my healthy banana and oat breakfast muffins. 

Since this year began, I have been making a real effort to eat better foods and cutting the amount of added sugar in my diet. I've always wanted to make breakfast muffins but never found a healthy alternative to the cakes and muffins I love.  I bought a blender, and last week made smoothies to drink before school but I got the idea from my friend Julie to make breakfast muffins this week. This recipe makes 10 muffins but I made 8 to make them bigger. If you would like to make your own banana breakfast muffins, the recipe will be written below. 

I began by getting my ingredients assembled as I find this the easiest way to combine everything if it was in its exact measurements. I opted for brightly coloured muffin cases to make the muffins more fun!


I then combined the dry ingredients and put them to one side.


Putting the hob onto a low heat, I drizzled the honey and butter into a saucepan and melted them together, for this, you really have to keep stirring the two ingredients so they don't brown or burn.


This is the sort of consistency you'd be looking for. 


I peeled and mashed two ripe bananas with my hands and then a fork. 


Add the banana to the honey and butter mixture until they're one puddle in your saucepan. 


Afterwards, I combined both the dry ingredients and the banana mixture. To finish, I scooped an even amount in each muffin case and popped them in the oven for 25 minutes. 


When the muffins were firm and golden brown, I took them out the oven and let them cool before putting them on a plate. They look so lovely and I can't wait to have them during the week!


I hope you enjoyed this post and have a go at them yourself, thankyou for reading. 

See you soon! 

Georgia xo 

_______________ 


Ingredients

  • 1/2 tsp bicarbonate of soda
  • 75ml milk
  • 1 tsp baking powder heaped 
  • 1/2 tsp cinnamon
  • 3 tsp runny honey (or 3 tsp sugar for under 1s) 
  • 25g unsalted butter
  • 55g porridge oats
  • 100g plain flour
  • 2 large ripe bananas

Method

  1. Preheat the oven to 190C/Gas Mark 5.
  2. Line a muffin tin with paper cases.
  3. Melt the butter and honey in a saucepan.
  4. Mix together all the dry ingredients in a bowl.
  5. Mash the banana and mix with the honey and butter.
  6. Add this mixture and the milk to the dry ingredients, stirring until mixed lightly.
  7. Spoon into the muffin cases (I sprinkle a few oats on top just to make them look a bit prettier!).
  8. Bake for 25 minutes until golden brown and firm to touch.


Friday, 18 December 2015

Festive Mince Pies

Hello Everybody! 

It's been ages since I've written a new recipe on here, but I've been really busy with school. I have been baking though, in fact, I made a Dorset Apple Cake, Victoria Sponge and Cinnamon Shortbread. But I'm back with something festive, that I think you'll love. Mince Pies! 

Now, I didn't make the pastry myself as the mince pies I made are to take to the pheasant shoot tomorrow. I decided to use Sainsbury's sweet shortcrust pastry and I also had a packet of Jus-Roll on standby. 


I began by buttering the mince pie tin (Yorkshire pudding tin) and rolling out the pastry until it was quite thin but not so thin that it broke. 


I used a flower peaked cutter to shape the case of the mince pie and placed each flower inside a hole in the tin. 


Using two teaspoons, I pushed an even amount of mincemeat into the holes. 


Mmmmmm 


To top the mince pies, I opted for a small star cutter and the same sweet pastry I used before. 


I egg washed each mince pie to give them a nice shiny glaze once baked. 


To finish, icing sugar. 


Festive Mince Pies! 


I hope you enjoyed this really easy recipe, I enjoyed making them! See you soon, 

Georgia xo